“Admin Notices Boss” Promo

I’ve recently released a new plugin: Admin Notices Boss. You can use it to hide specific admin notices based on various criteria. If that sounds like something you might be interested in, go check it out at adminnoticesboss.com!

If you already have an Admin Menu Editor Pro license, you can get a 30% discount when you purchase Admin Notices Boss. To get the discount code, enter your Admin Menu Editor Pro key here:


Features

Here’s a short list of what Admin Notices Boss can do:

  • Hide individual admin notices
    • for everyone;
    • for specific roles;
    • only for your user account;
  • Move notices to an out-of-the-way location.
    • There are two options: a Toolbar dropdown or a collapsible panel. If you choose the panel, you can put it next to “Screen Options” or leave it in the admin notice area.
    • You can move “hidden” notices to the dropdown/panel instead of hiding them completely.
  • Hide notices based on their type (info, warning, etc).
    • With optional exceptions for yourself.
  • Let other users hide and manage the notices they see.
    • By default, only Administrators can hide notices, but you can allow certain roles to hide notices for themselves.

What’s the Relationship Between “Admin Menu Editor Pro” and “Admin Notices Boss”?

While they’re both developed by the same person, each is a standalone product. There’s no special integration between the two plugins. You can use them together or separately.

One thing to keep in mind is that Admin Menu Editor Pro does have a “hide all admin notices” feature (in the “Tweaks” tab). If enabled, this setting will generally take precedence and hide all notices, even those set to “show normally” in Admin Notices Boss. If you use these plugins together, I recommend turning off that particular setting in AME Pro.

Version 2.21 – Admin Customizer

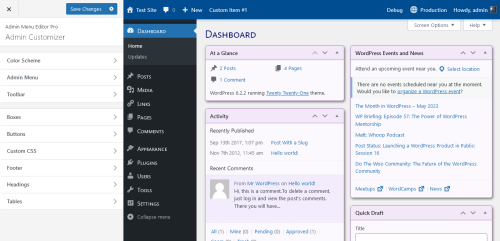
This version introduces a brand-new feature that has been in the works for a long time: Admin Customizer. Inspired by the Theme Customizer, this new interface lets you customize admin styles with live preview. It includes the existing menu style settings and a number of new customization options. You can access it by going to Settings -> Admin Customizer.

Admin Customizer interface

New Settings

You can now customize the appearance of additional parts of the WordPress admin interface:

  • Boxes – dashboard widgets, meta boxes, etc.
  • Buttons – primary and secondary WP buttons.
  • Headings – admin page headings like “Dashboard”, “Posts”, etc.
  • Tables – post tables, etc.
  • Toolbar – also known as the Admin Bar. Notably, this does not require the Toolbar Editor add-on. You can edit Toolbar styles (colours, etc) with just the core plugin.

Some of the previously existing settings like menu styles will also appear in the Admin Customizer. You can still find them in their usual places, too.

Admin Theme Generation

The Admin Customizer can generate an admin theme from your settings. The generated admin theme will be a stand-alone plugin that you can install on any site to apply your custom styles. It works without Admin Menu Editor Pro. To generate an admin theme, click the gear icon that’s next to the “Save Changes” button and choose “Download as admin theme” from the dropdown menu.

Some more about the admin theme:

Benefits

  • Includes a subset of visual customization settings, such as border styles, shadows, font sizes, and so on.
  • White-label: Set your own plugin name, description, author name, etc.
  • Much smaller and faster than Admin Menu Editor Pro.

Limitations

  • Does not include any per-role or per-user settings such as menu permissions, widget visibility, etc.
  • Does not include custom items or item-specific settings such as item order, renamed items, custom colours applied to individual menu items, etc.
  • Once generated, an admin theme is static: it has no settings page.

Other Notes

  • The Admin Customizer is a complex new feature, and it may currently be more buggy than the rest of the plugin.
  • When exporting settings through the “Export” tab, check the “Dashboard styles” option to export the new admin style settings.
  • If necessary, you can disable the Admin Customizer: go to the “Settings” tab in AME, find the “Modules” section, and uncheck “Admin Customizer”. Optionally, you can also uncheck “Dashboard Styler” to disable admin style customizations that were listed in the “New Settings” section above.

Version 2.20 – Widget Layout

This release adds a few new features and settings to the “Dashboard Widgets” tab.

Widget Order

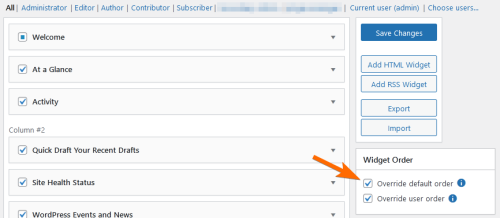
You can now drag and drop widgets to change their order. However, by default, this won’t have any effect on users’ dashboards. To actually apply the settings, you will also need to enable one or both of the following options:

  • Override default order – when enabled, overrides the widget order for all users who have not moved any widgets yet. This will mainly affect new users and users who haven’t tried to customize their dashboards. Users will still be able to move widgets around unless the next option is also enabled.
  • Override user order – overrides user-specified order with your custom settings. Users won’t be able to change the widget order while the plugin is active. You can enable this option for individual roles and users.

Widget order settings

Dashboard Columns

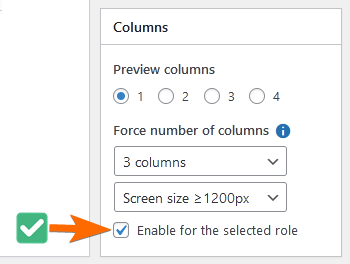
Usually, WordPress automatically organizes dashboard widgets in 1 to 4 columns based on screen width. You can now override the number of columns. There are a few different settings related to this feature:

  • Preview columns – this just sets the number of columns used in the “Dashboard Widgets” tab. It doesn’t affect the actual dashboard. Use it to help preview your widget layout.
  • Force number of columns – sets the custom number of columns and, optionally, a CSS breakpoint. If you choose one of the “Screen size N px” options, the column setting will only take effect when the screen/viewport is at least that many pixels wide.
  • Enable for the selected role – remember to check this box to actually apply the above settings to the selected role or user.

Dashboard column settings

Other Changes

  • Custom RSS widgets get an “Open links in a new tab” option.
  • Fixed several plugin conflicts, one of which could potentially cause a crash.

Version 2.19 – More Menu Customization

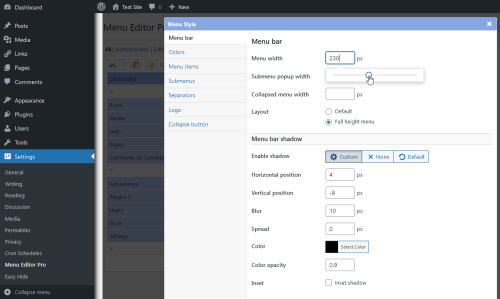
This release introduces a number of new visual customization settings for the WordPress admin menu.

  • Menu bar width
  • Menu bar shadow
  • Full-height menu layout
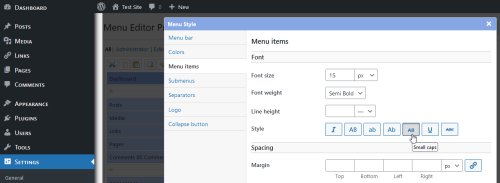
  • Menu item font size and style
  • Submenu popup shadow
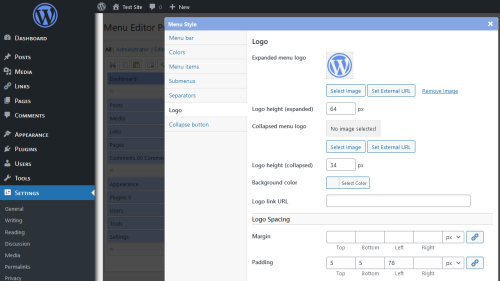
  • Logo above the admin menu
  • Custom “collapse menu” button text
  • … and a few more.

You can access these new features by clicking the “Style” button in the right sidebar of the menu editor. All of these settings support live preview, so you can see their effects without having to save the menu configuration first.

Screenshot of the "Menu bar" tab in the "Style" screen of Admin Menu Editor Pro. Menu width has been increased and menu layout has been changed to full-height.

Change the menu width and layout

Screenshot of the "Menu items" tab in the "Style" screen of Admin Menu Editor Pro. Some menu font styles have been changed.

Customize menu item fonts

Screenshot of the "Logo" tab in the "Style" screen of Admin Menu Editor Pro. A custom logo has been added to the top of the WordPress admin menu.

Add a custom logo to the admin menu

The existing “Colors” and “Separators” customization settings have also been moved to this new screen, and they also support live preview.

Notable Bug Fixes

Fixed several PHP warnings caused by invalid menu items

Normally, a menu item needs to have a URL and an associated capability. Even if you leave them empty when using the WordPress API to add a menu, WordPress will still create the corresponding fields in its internal menu data structure.

It turns out that some plugin developers have apparently managed to bypass that requirement, creating menu items where these fields are not just empty but actually missing. This could cause warnings like Undefined array key 2 in .../admin-menu-editor-pro/includes/menu-item.php when AME tried to process these items. Those warnings should be fixed in version 2.19.

However, if your site has any menu items like that, you might still see similar warnings in WordPress core files because WordPress itself also expects menu items to have URLs and capabilities.

Fixed a crash caused by invalid role capability lists

Some users reported seeing errors like array_merge(): Argument #1 must be of type array. Like the previous issue, this is also a case of plugins or themes supplying incorrect data when creating something: in this case, custom roles.

In WordPress, each role has a list of capabilities. This list can be empty, but should still be a list (i.e. an array). However, it turns out that in very rare cases it can be null or false, which would previously cause AME to crash when it tried to read role capabilities. That should also be fixed in this release.

Plugin conflicts

  • WPForms: The hidden menu item “Dashboard -> Welcome to WPForms” will no longer become visible when activating AME.
  • Toolset Types: The settings in the “Redirects” tab will now work properly when Toolset Types is active.

Version 2.17 – Easy Hide

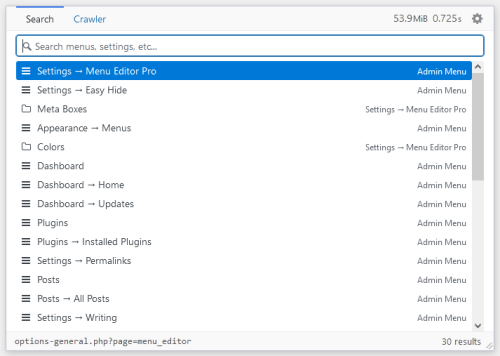
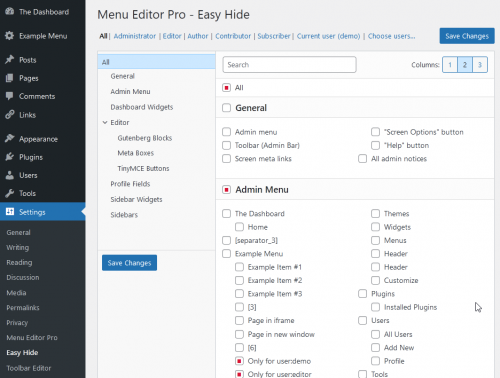
The main new feature in this release is the “Settings → Easy Hide” admin page. This new page collects most settings that are related to hiding things and puts them in one place. You can find specific settings more quickly thanks to category-based navigation (no page reloads!) and a built-in search box.

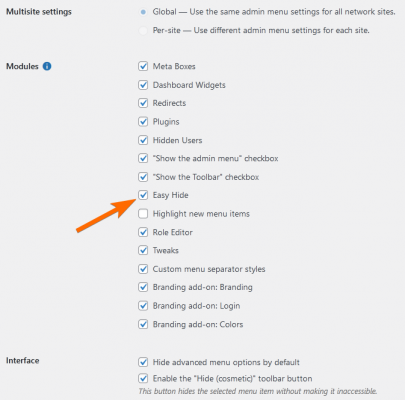
Screenshot of the "Easy Hide" settings page

Why?

The intent of this feature is to help people who mainly use the plugin to hide parts of the admin interface and to clean up the dashboard. Previously, you might have had to look through multiple different tabs to find the setting that would hide a specific element. This was made more difficult by the fact that some of the tabs contain a large number of settings, and only some of those settings have to do with hiding things. Now you can find nearly all of the “hide X” settings in a central location (a few things – like hiding plugins from the “Plugins” page – are currently not included).

Removing the “Easy Hide” menu

Of course, some users might not want a separate page for this, and would rather avoid cluttering the admin menu with additional items. You can disable this feature and remove the “Easy Hide” menu item like this:

  1. Go to “Settings → Menu Editor Pro”.
  2. Switch to the “Settings” tab.
  3. Find the “Modules” section.
  4. Uncheck the “Easy Hide” option.
  5. Save changes.

Whether you use this feature or not, all of the settings that it shows will also still be available in their usual locations on the “Menu Editor Pro” settings page.

Version 2.16 – Redirects

The main change in this version is the new “Redirects” feature.

Redirect Types

You can create a few kinds of redirects:

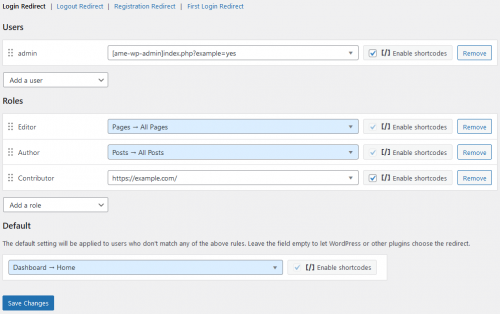
  • Login Redirect lets you send the user to a specific URL when they log into WordPress. You can redirect to an existing admin page or a custom URL.
  • Logout Redirect lets you redirect the user somewhere when they log out.
  • Registration Redirect lets you choose the page that a new user will see after they register an account.
  • First Login Redirect is just like a login redirect, except it only happens when the user logs in for the first time.

Redirect settings

Redirect Features

  • You can make redirects for specific roles, specific users, or all users.
  • Use shortcodes in redirect URLs.
  • Drag & drop role redirects to change their priority.
  • If something goes wrong, you can disable all custom redirects by adding this line to wp-config.php:
    define('AME_DISABLE_REDIRECTS', true);

New Shortcodes

This version also adds a few new shortcodes that can help create dynamic redirects. Of course, you can also use these shortcodes in posts and pages.

  • [ame-wp-admin] – base URL of the WordPress dashboard.
  • [ame-home-url] – site URL. Usually the same as “Site Address” in Settings → General.
  • [ame-user-info field="..."] – information about the logged-in user. Use the field parameter to choose one profile field or property to display. Parameters:
    • field – Supported fields include: ID, user_login, display_name, locale, user_nicename, user_url, and so on.
    • placeholder – Optional. Text that will be shown if the visitor is not logged in.
    • encoding – Optional. This lets you control how the plugin will encode or escape the output. Supported values:
      • auto (default) – the plugin will automatically choose either html or none depending on the context.
      • html – convert quotes and special characters like > and & to HTML entities.
      • attr – as html, but for use inside HTML tag attributes.
      • attr – escape text for use in inline JavaScript.
      • none – no special encoding; output the text as-is.

See the changelog for a few more minor details about this release.

Version 2.12 – Editable Roles, Separator Customization, and Bug Fixes

This version adds a couple of new features to the menu editor and role editor modules. It also fixes a number of plugin conflicts and compatibility issues.

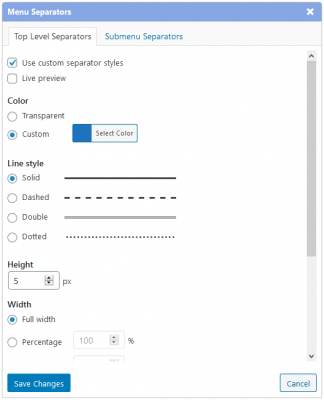
This release adds a number of settings that let you customize the appearance of admin menu separators. You can change:

  • Color
  • Line style (e.g. solid, dashed, etc)
  • Width and height
  • Margins
  • Horizontal alignment

You can apply different styles to top level and submenu separators, or use the same settings for both types of menu separators. To access separator settings, click the “Separators” button in on the right side of the menu editor.

Separator settings dialog added in version 2.12

“Editable Roles” Settings

By default, when you give a role or user the ability to edit other users, WordPress will let them edit all users and they will be able to assign any role to anyone. This can be a problem if you want to have multiple roles that can edit users but you don’t want them to have the ability to give the “Administrator” role (or equivalent) to anyone they want.

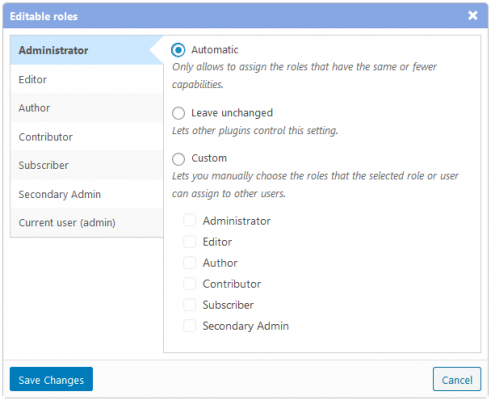
One way to avoid that problem is to use the new “Editable Roles” feature introduced in version 2.12. This feature lets you control which roles someone can assign to other users. Additionally, it prevents people from editing users that have a non-editable role. For example, if you have a custom role that can edit other users, you could use this feature to prevent that role from editing administrators.

Screenshot of the Editable Roles dialog that was added in version 2.12

The default setting is “Automatic”. When a user with role A tries to do something with role B (e.g. they try to assign role B to another user), the plugin will compare the capabilities of A and B to automatically determine if the user is allowed to do that. In general, role A will be able to edit/assign role B only if role B has the same or fewer capabilities as role A. For example, if you give the “Editor” role permission to edit users, they will not be able to assign the “Administrator” role to anyone because “Administrator” has more capabilities than “Editor”.

Assign Multiple Roles to Users

Version 2.12 adds a new panel to the “Roles” tab that lets you change a user’s role without having to go to their profile. You can also assign multiple roles to one user. When you check or uncheck a role, you can immediately see how it affects user capabilities.

Screenshot of the new settings panel added in version 2.12 that lets you set the user role and assign multiple roles to one user

Notable Bug Fixes

Fixed a crash caused by invalid capabilities

Normally, a role capability is a keyword or short phrase like read, edit_posts or manage_options. In other words, it’s text. However, there are some plugins that incorrectly use non-textual values in place of regular capabilities. For example, there is at least one plugin that uses false (the boolean value, not the word) when setting the capabilities of a custom post type.

Originally, Admin Menu Editor Pro couldn’t handle invalid capabilities. The “Roles” tab would crash and just display a blank page, making it impossible to edit role capabilities. Version 2.12 fixes that by detecting invalid capabilities and displaying them as such. Now you will be able to use the settings in the “Roles” tab even if some capabilities are of the wrong data type.

Fixed a bug that sometimes made it impossible to give capabilities to new/custom roles

Due to an oversight in the initial release of the “Roles” feature, it was not possible to add capabilities to roles that didn’t already have at least one capability. For example, if you created a new role and didn’t give it any initial capabilities, you would not be able to assign capabilities to that role later. Version 2.12 fixes this bug.

This plugin uses a third-party JavaScript library called “jquery-cookie” to set cookies in the browser. It mainly uses cookies to remember interface settings, like which panels or boxes are open/closed. Some other plugins use different, incompatible versions of the same library. If one of those plugins loads its version of “jquery-cookie” on an Admin Menu Editor Pro settings page, this could cause a conflict and break Admin Menu Editor Pro in subtle and unexpected ways.

This has been fixed in version 2.12. Now AME should continue to work fine even if another plugin (or theme) loads an incompatible version of “jquery-cookie”.

Fixed hidden plugins showing up in various places

As of this release, hidden plugins will no longer show up under “Dashboard -> Updates”. They also won’t be included in the number of updates show in the admin menu, the Toolbar (a.k.a Admin Bar), and other places.

Fixed minor WP 5.5 compatibility issues

The upcoming WordPress release includes some small changes to the layout of admin dashboard widgets and meta boxes. Previous versions of this plugin were not fully compatible with these changes, which meant that some of the widgets and boxes shown on Admin Menu Editor Pro settings pages would display incorrectly (though they would still work fine). Version 2.12 fixes that problem.


See the full list of changes in the changelog.

Version 2.11 – Role Editor, Admin CSS, and a Few Gutenberg Tweaks

This release includes a few frequently requested features and a number of bug fixes.

Role Editor

Admin Menu Editor Pro has always been limited by the fact that it could only change those role permissions that have a corresponding admin menu item. For example, you could use  it to hide the Appearance -> Themes menu from a role or user, but if you just wanted to prevent someone from installing new themes, you wouldn’t be able to do that because there is no “add new themes” menu item. Instead, you would have to install a separate role editing plugin and disable the install_themes capability.

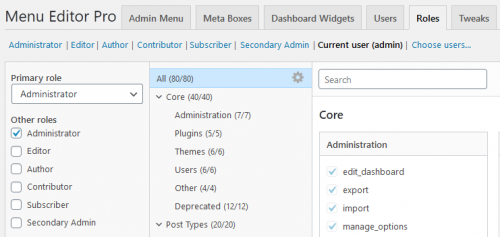
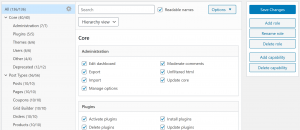
Version 2.11 adds a built-in role editor to Admin Menu Editor Pro. You can find it in the new “Roles” tab on the Settings -> Menu Editor Pro page. You can use it to assign/deny capabilities to roles or users, create new roles, delete roles, and more.

Screenshot of the "Roles" tab

Keep in mind that this is a new and complex feature, so it may not be as stable as the rest of the plugin. If you notice any bugs or other issues, please report them.

Custom Admin CSS

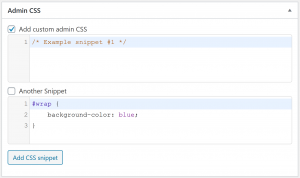
This release also adds the ability to add your own CSS code to the WordPress admin back-end. You can add multiple CSS snippets and you can enable each snippet for all users or only for specific roles.

Screenshot of the "Admin CSS" section in the "Tweaks" tab

Gutenberg Tweaks

Finally, version 2.11 includes a few Gutenberg-related features:

  • You can hide individual Gutenberg blocks from roles or users. Go to the “Tweaks” tab to find these settings.
  • You can also hide the Gutenberg options menu.
  • Hiding the “Format” and “Publish” meta boxes now also hides the corresponding rows in Gutenberg’s “Status & Visibility” panel.

Screenshot of the "Hide Gutenberg Blocks" section in the "Tweaks" tab


See the full list of changes in the changelog.

Version 2.10 – Tweaks

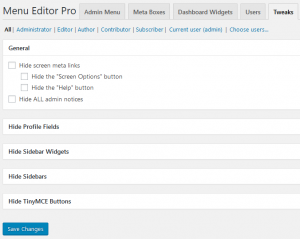
This release adds a new tab called “Tweaks” to the plugin settings page.

Tweaks tab

This tab contains miscellaneous small modifications (“tweaks”) that you can enable for specific roles or users. These tweaks are available in version 2.10:

  • Hide “Screen Options” and “Help”.
  • Hide all admin notices. This includes even core notices like “settings saved”.
  • Hide specific user profile fields.
  • Hide sidebars and sidebar widgets. This applies to Appearance -> Widgets but not to the site front-end.
  • Hide TinyMCE buttons (TinyMCE is the classic post editor).

The plugin updates the list of available TinyMCE buttons when you open the post editor, so if you notice that the list is missing a button, try editing a post or page.

Why Add Tweaks?

Over the years, users have sent me many feature suggestions. Some of the suggestions are both valuable and relatively easy to implement, but they don’t quite fit anywhere. Adding more and more options to the menu editor wouldn’t work: every top level menu item already has 10+ settings and expanding that list without limit would make it difficult to find the settings that you actually need. Trying to sort the settings into separate tabs is also impractical because many of the feature suggestions have little in common. You would end up with a lot of new tabs that each contain just a handful of checkboxes. The plugin already has 8 tabs (more if you install the Branding add-on), so this approach also runs the risk of making the settings too cluttered.

The “Tweaks” tab is a compromise: one new tab for all the little customizations that don’t fit anywhere else, organized in sections. That’s still a lot of disparate settings in one place, but it’s somewhat orderly and you can collapse the sections that you’re not interested in. The plugin will remember which sections were open and which were closed.

If you don’t need any of the available tweaks, you can slightly improve plugin performance by turning off the “Tweaks” module in the “Settings” tab.

Other Changes

Version 2.10 also includes a few minor bug fixes related to meta boxes, plugin compatibility, and error handling.

Version 2.7 – Import and Export

The biggest change in this release is the improved import/export feature. Previously, you could only export some parts of the plugin configuration like the admin menu and dashboard widgets. You also had to go to each individual tab to export the settings in that tab.

This version adds a new “Export” tab – a central location for all your configuration export needs.

Export settings

You can also export much more of the configuration, including meta box settings, plugin visibility, Branding add-on settings (if you have that installed), submenu icon settings, UI color scheme settings, and more. There are still some things that cannot be exported, like some debugging settings. If you notice anything important missing, let me know.

Once you have an export file, you can import it through the “Import” tab.

Import settings - Step #1

You can choose which parts of the configuration to import:

Import settings - Step #2

You can also export plugin configuration using the command line (requires WP-CLI):

wp admin-menu-editor export filename.json --all

Import it like this:

wp admin-menu-editor import filename.json

The old import/export features like the “Export” button in the menu editor are still in place and still work like they did before, at least for now. They will be removed in a future release because having multiple “Export” buttons that all do different things would probably be confusing.