Table of Contents
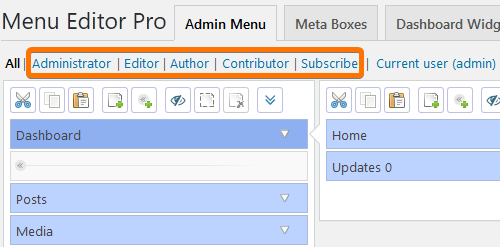
How to Hide a Menu From a Role
- Click the name of the role.
- Find the item you want to hide. If it’s a submenu item, click the parent menu to select it and display the submenu list.
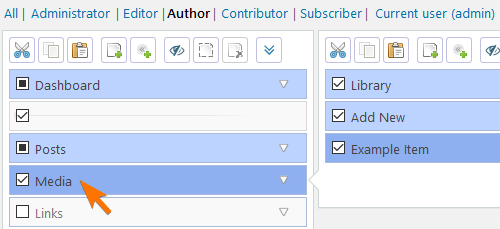
- Uncheck the box that’s to the left of the menu item.
How to Hide a Menu From a User
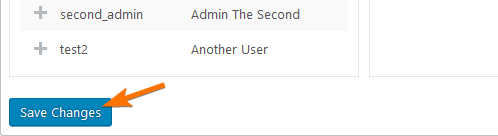
- Click the “Choose users…” link to open the “Select Visible Users” dialog.

- Find the user in the left column and click the “+” sign.
Note: This dialog only shows up to 30 users at a time. If you don’t see the one you need in the list, enter their username in the search box and wait a few seconds.
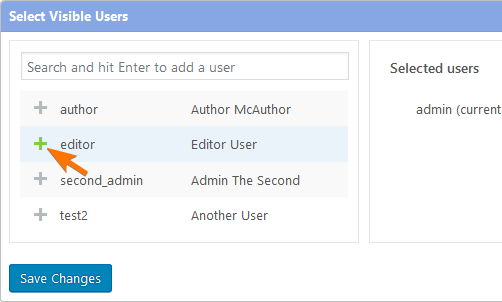
- Click “Save Changes”. The user(s) you selected will be added to the end of the role list.
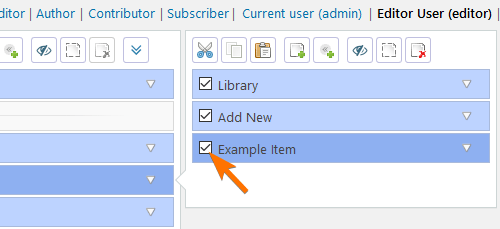
- Click the name of the user.

- Uncheck the menu item you want to hide.
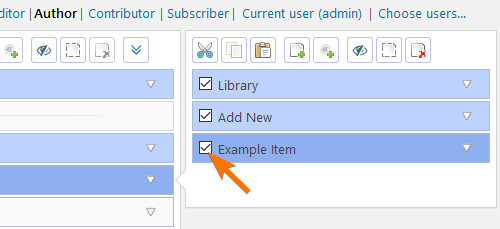
How to Hide a Menu From Everyone Except Yourself
While you can accomplish this by selecting each role, unchecking the menu item, then clicking “Current user” and checking the item, there is a faster way to do it.
- Click the “All” option in the role list. Usually it’s already selected by default when you open the menu editor.

- Click the menu item you want to hide.

- Click the “Hide and prevent access” toolbar button.
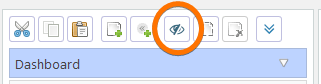
This will uncheck the selected item for all roles but leave it enabled for the current user. In Multisite, it will also leave the menu visible to Super Admins. You can restore the previous permissions by clicking the same button again.
Troubleshooting
What if you’ve unchecked a menu item but that didn’t actually hide it? Here are a few things to try:
- Does the user have multiple roles? Uncheck the item for all of their roles.
- Was the menu already unchecked by default? Try checking it and then unchecking it again.
This usually happens with plugins that use meta capabilities. The menu editor can’t reliably determine which roles have these capabilities, so it falls back to showing the menu as unchecked for all roles. Manually unchecking/checking the item works because it tells the menu editor that you want to override the default permissions. - Is it a top level menu? Make sure it doesn’t have any visible submenus. A top level menu will stay visible as long as it has at least one visible submenu item. This is a bit counter-intuitive, but it’s how WordPress works. The menu editor follows the same rules by default to maintain compatibility.
- You can override this behaviour. Open the “Permissions” dialog and check the box “Hide all submenu items when this item is hidden”.
- Compare the menu URLs that you see when logged in as different users. As an admin, do you see the same URL as the user or role that you’re trying to customize? This plugin identifies admin pages by their URL, so if they don’t match, you probably won’t be able to hide that item.
- Enable debug logging. Caution: The log will be visible to all logged-in users, so you might not want to do this on a production site.
- Go to the “Settings” tab in the menu editor.
- Check this box: “Show menu access checks performed by the plugin on every admin page”.
- Save changes. You will now see a large block of text at the top of every admin page.
- Log in as the role or user in question.
- Click the menu item that you’re trying to hide.
- Examine the log for clues. Does it show the correct menu title and URL? Does it show the roles that you expected? Does it mention the custom permissions you’ve set for those roles, if any?
- Turn off logging.
- Contact me. For best results, please include:
- The name of the menu item.
- The name and homepage of the plugin or theme that created this item.
- The role(s) that you were trying to customize.
- The debug log, if any.
Related
- Menu permissions – a general overview.
- How to Hide a Menu Without Preventing Access
- How to Show a Menu – usually it’s as simple as checking the box, but custom post types and taxonomies can be more complicated.